 
		    	
		
		The Basics 
		DJBeans is a free lib / tool composed of two parts: 
		
			- the DJBeans Console, a web application used to edit the application properties.  
- the DJBeans application lib, used by the application to access its 
			porperties and to receive properties' update notifications.	
			These properties can be accessed by application as properties map or injected on 
			application beans. Updates on the propeties can automatically update these beans
			or, if desired, the application can be notified through notification listeners.
 The downloadable release is composed of the following items: 
		
		
			- djb.jar - implemetation of the DJBeans. Includes source files. 
- djbeans.ini - DJBeans configuration file. Must be included in application CLASSPATH.
- djbeans.ini.path -  this file can be, alternatively, used to indicate the location of the djbeans.ini file. It must also be included in application CLASSPATH. 
- console.war/ -  files to pack e deploy the DJBenas console (.jsp,.html,.js,*.ini,libs).
- console.war/WEB-INF/lib -  dependencies for the DJBeans Console web application. PS: Select the appropriate database lib to use in with your database.
- console.war/WEB-INF/web.xml -  sample configuration to the web application that deploys the DJBeans Console. 
- example.src/ -  sample client code. 
Hands on 1: Deploying the DJBeans Console 
	
		Let's now setup a web application to run the DJBeans console. 
		You will need one database server running. On this example, 
		the database server is configured with:
		
			- MySql
- Host: localhost
- User: root
- Password: '' (none) 
- URL: jdbc:mysql://localhost:3306/djbexample
djbeans.ini


## Mandatory to define database TYPE: 'mysql' or 'oracle'
djbeans.datasource.type=mysql
#djbeans.datasource.type=oracle
## JDBC configuration to the Datasource
djbeans.datasource.jdbc.url=jdbc:mysql://localhost:3306/djbexample
djbeans.datasource.jdbc.user=root
djbeans.datasource.jdbc.pwd=
## Alternative configuration via JNDI Datasource ID and optional java properties to JNDI context properties
#djbeans.datasource.jndi.id=myds
#java.naming.factory.initial
#java.naming.provider.url
#java.naming.security.authentication
#java.naming.security.principal
#java.naming.security.credentials
## Mandatory to define the VERSION for use in application (not used by the web console).
#djbeans.version=5.0
## (optional) Alternative name to djbeans database table. Default is 'djbeans'
#djbeans.table=djbeans
	
		The web application


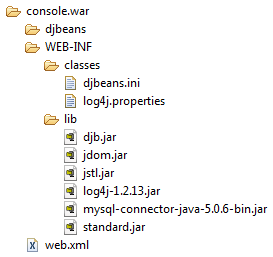
	 	Here, we will pack one web application to run the DJBeans Console. 
		As ilustrated, the "djbeans" directory was included in the root context of the application.
		This contains the implementation files (*.js,*.jsp) of the DJBeans Console.


		In the WEB-INF/classes are includes: 
		
			- djbeans.ini, as prepared in the previous section.
- log4j.properties, optional, but it's interesting to be included. 
In the WEB-INF/lib are includes the dependence libs of the application: 
		
			- djb.jar, java implementation classes of DJBeans.
- jstl.jar  and standard.jar, JavaServer Pages Standard Tag Library (JSTL)
			implementation of Jakarta. Version: 1.1.2 
- log4j-1.2.13.jar, implementation of the Apache log4j.
- mysql-connector-java-5.0.6-bin.jar, jdbc driver implementation to the selected database server in this example: MySql.
- jdom.jar, implementation of the JDOM xml parser.
web.xml
		
		
	    Some elements must be declarated in the web.xml file: 
		
			- The <servlet> to receive the DJBeans Console requests.
- The <servlet-mapping> thats map all *.djbeans urls to the DJBeans Servlet. 
Others important access control elements are: 
		
			- The <security-constraint> thats restricts access to the Console pages. 
			Only users with djb_admin or djb_readonly roles can gain access to the pages. 
- The <login-config> thats defines the FORM access control and the login page (a DJBeans page). 
- The <security-role> thats defines the two roles names to the web application. 
It's possible to deploy the application without any security config in web.xml, that is, without
		<security-constraint>, <login-config> or <security-role> items. 
		In this way, no access control will be made. 


<?xml version="1.0" encoding="UTF-8"?>
<web-app id="WebApp_ID" version="2.4" xmlns="http://java.sun.com/xml/ns/j2ee" 
        xmlns:xsi="http://www.w3.org/2001/XMLSchema-instance" 
        xsi:schemaLocation="http://java.sun.com/xml/ns/j2ee http://java.sun.com/xml/ns/j2ee/web-app_2_4.xsd">
    <servlet>
            <servlet-name>DJBeansServlet</servlet-name>
            <servlet-class>djbeans.web.DJBeansServlet</servlet-class>
            <init-param> <!-- identify the admin role -->
                   <param-name>adminRole</param-name>
                   <param-value>djb_admin</param-value>
            </init-param>   
    </servlet>
    
    <servlet-mapping>
            <servlet-name>DJBeansServlet</servlet-name>
            <url-pattern>*.djbeans</url-pattern>
    </servlet-mapping>
    
    <welcome-file-list>
            <welcome-file>index.jsp</welcome-file>
    </welcome-file-list>
    
    <security-constraint>
            <web-resource-collection>
                    <web-resource-name>DJBeansPages</web-resource-name>
                    <url-pattern>/djbeans/jsp/*</url-pattern>
                    <http-method>GET</http-method>
                    <http-method>POST</http-method>
                    <http-method>DELETE</http-method>
                    <http-method>PUT</http-method>
            </web-resource-collection>  
            
            <auth-constraint>
                    <role-name>djb_admin</role-name>
                    <role-name>djb_readonly</role-name>
            </auth-constraint>
              
            <user-data-constraint>
                    <transport-guarantee>NONE</transport-guarantee>
            </user-data-constraint>
    </security-constraint>
    
    <login-config>
            <auth-method>FORM</auth-method>
            <realm-name>default</realm-name>
            <form-login-config>
                    <form-login-page>/djbeans/jsp/login.jsp</form-login-page>
                    <form-error-page>/djbeans/jsp/login.jsp</form-error-page>
            </form-login-config>
    </login-config>
    
    <security-role>
            <role-name>djb_admin</role-name>
            <role-name>djb_readonly</role-name>
    </security-role>    
    
</web-app>
		web.xml (minimal)


<?xml version="1.0" encoding="UTF-8"?>
<web-app id="WebApp_ID" version="2.4" xmlns="http://java.sun.com/xml/ns/j2ee" 
        xmlns:xsi="http://www.w3.org/2001/XMLSchema-instance" 
        xsi:schemaLocation="http://java.sun.com/xml/ns/j2ee http://java.sun.com/xml/ns/j2ee/web-app_2_4.xsd">
    <servlet>
            <servlet-name>DJBeansServlet</servlet-name>
            <servlet-class>djbeans.web.DJBeansServlet</servlet-class>
    </servlet>
    
    <servlet-mapping>
            <servlet-name>DJBeansServlet</servlet-name>
            <url-pattern>*.djbeans</url-pattern>
    </servlet-mapping>
    
    <welcome-file-list>
            <welcome-file>index.jsp</welcome-file>
    </welcome-file-list>    
    
</web-app>
	    Deploying
		
		That's all.
		
		One last TIP: this example was packed with access control. Then, it's necessary 
		to define users associated with the two djbeans roles in the application server. 
		In Apache Tomcat, we can do it editing the %CATALINA_HOME%/conf/tomcat-users.xml like this:


<?xml version='1.0' encoding='utf-8'?>
<tomcat-users>
		<role rolename="manager"/>
		<user username="tomcat" password="tomcat" roles="manager"/>
  
		<role rolename="djb_admin"/>
		<role rolename="djb_readonly"/>
		<user username="admin" password="admin" roles="djb_admin"/>
		<user username="user" password="user" roles="djb_readonly"/>
</tomcat-users>
	    Hands on 2: Running the application 
	    		
		
            In this example will be used the Apache Tomcat 5.5.26 on port 8080 to deploys the djb.war file. 
               In this way, my URL to access de console is: http://localhost:8080/djb/djbeans 
		
	        
			If all is correct, the DJBeans Login form will be showed. The next figure ilustrates 
	           this page. Here, type the user admin and its password. 


	        As the table of the DJBeans is not still created, this page is presented 
			with the option of creating the table in the database. 
			Click in "Create djbeans table".


	        Success. The DJBeans Console is ready to create the application configuration properties. 


		Hands on 3: Accessing the properties 
		
	    
	        Now, will be necessary to create some properties to run the next examples.
			The figure on side shows this configuration:
			
				- Version: "5.0"
- Folder: "/djb_examples"
- Folder: "/djb_examples/service"
- Property: id = "host.ip"   and value = "64.233.167.99"
- Property: id = "host.port" and value = "80"
- Property: id = "enable"    and value = "true"
- Property: id = "user"      and value = "bruno"
- Property: id = "password"  and value = "secret"
you can import the configuration from this file.
			To run these examples, define wich version we are interested to in djbeans.ini.


        djbeans.ini


## Mandatory to define database TYPE: 'mysql' or 'oracle'
djbeans.datasource.type=mysql
#djbeans.datasource.type=oracle
## JDBC configuration to the Datasource
djbeans.datasource.jdbc.url=jdbc:mysql://localhost:3306/djbexample
djbeans.datasource.jdbc.user=root
djbeans.datasource.jdbc.pwd=
## Alternative configuration via JNDI Datasource ID and optional java properties to JNDI context properties
#djbeans.datasource.jndi.id=myds
#java.naming.factory.initial
#java.naming.provider.url
#java.naming.security.authentication
#java.naming.security.principal
#java.naming.security.credentials
## Mandatory to define the VERSION for use in application (not used by the web console).
djbeans.version=5.0


	   Example 1 - Retrieve the property map
	   
	   
		| 
		import djbeans.DJBeansLoader;import djbeans.PropertyMap;
 
 public class Example1
 {
 public static void main(String[] args)
 {
 try
 {
 DJBeansLoader f = DJBeansLoader.init();
 
 PropertyMap m = f.getPropertyMap("/djb_examples/service");
 
 String  ip      = m.getProperty("host.ip");
 int     port    = m.getPropertyInt("host.port");
 boolean enabled = m.getPropertyBool("enable");
 String  user    = m.getProperty("user");
 String  pwd     = m.getProperty("password");
 
 System.out.println(ip + "\n" + port + "\n" + enabled + "\n" +
 user + "\n" + pwd);
 }
 catch (Exception e)
 {
 e.printStackTrace();
 }
 }
 }
 | 
	   
	   
       Example 1 - output
       
64.233.167.99
80
true
bruno
secret


        Example 2 - Working with Java Beans
        
        For this example, will be defined 2 Java Beans: ServiceBean and HostBean and the same configuration of the example 1.
           
		   
		   Note that: 
           
            - the ServiceBean has a child bean of the type HostBean.
- There is a correlation between the names of the beans and the names of the
                properties of the djbean folder "service".
ServiceBean
                
        | 
		public class ServiceBean {
 private boolean  enable;
 private String   user;
 private String   password;
 private HostBean host;
 
 public boolean isEnable() {return enable;}
 public void    setEnable(boolean enable) {this.enable = enable;}
 
 public String getUser() {return user;}
 public void   setUser(String user) {this.user = user;}
 
 public String getPassword() {return password;}
 public void   setPassword(String password) {this.password = password;}
 
 public HostBean getHost() {return host;}
 public void setHost(HostBean host) {this.host = host;}
 }
 | 


        HostBean
                
        | 
		public class HostBean {
 private String ip;
 private int    port;
 
 public String getIp() {return ip;}
 public void   setIp(String ip) {this.ip = ip;}
 
 public int  getPort() {return port;}
 public void setPort(int port) {this.port = port;}
 }
 | 


        Example 2
                
        | 
		import djbeans.DJBeansLoader;
 public class Example2
 {
 public static void main(String[] args)
 {
 try
 {
 DJBeansLoader f = DJBeansLoader.init();
 
 ServiceBean b = new ServiceBean();
 /* Inject the properties of the component "/djb_examples/service"
 into the bean */
 f.injectProperties(b, "djb_examples/service");
 
 System.out.println("User: "+b.getUser());
 System.out.println("Password: "+b.getPassword());
 System.out.println("Enable: "+b.isEnable());
 
 System.out.println("Host IP: "+
 (b.getHost()!=null?b.getHost().getIp():null) );
 System.out.println("Host Port: "+
 (b.getHost()!=null?b.getHost().getPort():null) );
 }
 catch (Exception e)
 {
 e.printStackTrace();
 }
 }
 }
 | 
        
       Example 2 - output
       
User: bruno
Password: secret
Enable: true
Host IP: 64.233.167.99
Host Port: 80


        Example 3 - Automatically, update the properties of the beans.
        
        | 
		import djbeans.DJBeansLoader;
 public class Example3
 {
 public static void main(String[] args)
 {
 try
 {
 /* startCheckUpdateThread = true
 * timeSecondsBetweenChecks = 5 seconds
 */
 DJBeansLoader f = DJBeansLoader.init(true,5);/*!!*/
 
 ServiceBean b = new ServiceBean();
 /* Inject the properties of the component "service" into the bean
 * !! registerListener -> true */
 f.injectProperties(b, "/djb_examples/service",true); /*!!*/
 
 //Loop to wait the property update at DJBeans Console.
 for (int i = 0; i < 100; i++)
 {
 System.out.println("Host Port: "+
 (b.getHost()!=null?b.getHost().getPort():null) );
 try{Thread.sleep(1000);}catch (Exception e){}
 }
 }
 catch (Exception e)
 {
 e.printStackTrace();
 }
 }
 }
 | 
        
       Example 3 - output
       
Host Port: 80
Host Port: 80
Host Port: 80
Host Port: 80
Host Port: 80
...
  
       Access the DJBeans Console and update the value of the property 
       "host.port" of the djbean folder "service" to "7001". You will note that the log messages will change: 
       
       Example 3 - output updated
       
Host Port: 80
Host Port: 80
Host Port: 80
Host Port: 80
...
Host Port: 7001
Host Port: 7001
Host Port: 7001
Host Port: 7001
Host Port: 7001
...


       Example 4 - Receive update notifications with property listeners
       
       
        | 
        import djbeans.DJBeansLoader;import djbeans.PropertyListener;
 import djbeans.PropertyMap;
 
 /**
 * This class implements the DJBenas interface "djbenas.PropertyListener"
 * in order to receive notifications of property updates.
 */
 class ExampleListener implements PropertyListener
 {
 public void notifyPropertyUpdate(String componentPath, String propertyName,
 String value)
 {
 System.out.println("componentPath ["+componentPath+"] property name " +
 "["+propertyName+"] new value ["+value+"]");
 }
 }
 
 public class Example4
 {
 public static void main(String[] args)
 {
 try
 {
 /* startCheckUpdateThread = true
 * timeSecondsBetweenChecks = 5 seconds
 */
 DJBeansLoader f = DJBeansLoader.init(true,5);
 
 PropertyMap m =f.getPropertyMap("/djb_examples/service");
 
 System.out.println(m.getProperty("host.ip"));
 
 /* Add listener to receive notification for updates on properties
 * of the component "service".
 */
 f.addPropertyListener(new ExampleListener(),"/djb_examples/service");
 
 //Loop to wait the property update at DJBeans Console.
 for (int i = 0; i < 100; i++)
 {
 try{Thread.sleep(1000);}catch (Exception e){}
 }
 }
 catch (Exception e)
 {
 e.printStackTrace();
 }
 }
 }
 | 


       Example 4 - output
       
64.233.167.99
         
       
       Access the DJBeans Console and update the value of the property 
       "host.ip" of the djbean folder "service" to "200.1.1.1". You will view one new log message: 
       
       Example 4 - output updated
       
64.233.167.99
componentPath [/djb_examples/service] property name [host.ip] new value [200.1.1.1]


       Example 5 - Manages log4j loggers level
       
       
       DJBeans recognizes, in a special way, the djbean folder with the name "log4j". 
       Properties of this folder identify log4j loggers. Propety values
       identify the level that we intends to apply to it.
       
       For this example, the content of the "log4j.properties" file is:  
       
log4j.rootLogger=ALL,console
# Appender para CONSOLE
log4j.appender.console=org.apache.log4j.ConsoleAppender
log4j.appender.console.layout=org.apache.log4j.PatternLayout
log4j.appender.console.layout.ConversionPattern=%-5p %c [%d] %m%n
         
       
       Example 5
       
	   
        | 
		import org.apache.log4j.Logger;import djbeans.DJBeansLoader;
 
 public class Example5
 {
 public static void main(String[] args)
 {
 try
 {
 /* startCheckUpdateThread = true
 * timeSecondsBetweenChecks = 5 seconds
 */
 DJBeansLoader.init(true,5);/*!!*/
 
 Logger log = Logger.getLogger("ex5logger");
 
 //Loop to wait the property update at DJBeans Console.
 for (int i = 0; i < 100; i++)
 {
 log.warn("djbeans manages this log.");
 try{Thread.sleep(1000);}catch (Exception e){}
 }
 }
 catch (Exception e)
 {
 e.printStackTrace();
 }
 }
 }
 | 


       Example 5 - output
       
WARN  ex5logger [2008-09-20 22:37:37,435] djbeans manages this log.
WARN  ex5logger [2008-09-20 22:37:38,435] djbeans manages this log.
WARN  ex5logger [2008-09-20 22:37:39,435] djbeans manages this log.
WARN  ex5logger [2008-09-20 22:37:40,435] djbeans manages this log.
WARN  ex5logger [2008-09-20 22:37:41,435] djbeans manages this log.
...


       This example creates a logger "ex5logger" and manages its log level. 
       The property name in DJBeans will be "ex5logger" too. 
       The logger don't need to be defined into de "log4j.properties" file.
        
       In this case, the property value need to be one of these: 
       OFF, FATAL, ERROR, WARN, INFO, DEBUG, TRACE or ALL. 
       
        
            Now, will be necessary to create one property to manage this logge level.
            The figure on side shows this configuration:
            
                - Version: "5.0"
- Folder: "log4j"
- Property: id = "ex5logger" and value = "ERROR"


        As soon as the new property value is saved, you will note that the 
        log message will stop. Save again the property with the value 
        "TRACE", "DEBUG" or "WARN" and you will note that the log message
        will return.


       Example 6 - List Properties
       
       
       This example ilustrates the use of LIST properties on DJBeans.
       
        
            To this example, create one list property at the djbeans console.
            The figure on side shows this configuration:
            
                - Folder: "/djb_examples/list"
- Property: id = "item:1" and value = "value 1"
- Property: id = "item:2" and value = "value 2"
- Property: id = "item:3" and value = "value 3"


       Example 6
       
	   
        | 
		import djbeans.DJBeansLoader;
 public class Example6
 {
 public static void main(String[] args)
 {
 try
 {
 /* startCheckUpdateThread = true
 * timeSecondsBetweenChecks = 5 seconds
 */
 DJBeansLoader f = DJBeansLoader.init(true,5);/*!!*/
 
 ListBean b = new ListBean();
 /* Inject the properties of the component "service" into the bean
 * !! registerListener -> true */
 f.injectProperties(b, "/djb_examples/list",true); /*!!*/
 
 //Loop to wait the property update at DJBeans Console.
 for (int i = 0; i < 100; i++)
 {
 String itens[] = b.getItem();
 for (int j = 0; j < itens.length; j++)
 {
 System.out.print(" | item ["+(j+1)+"]: "+itens[j]);
 }
 System.out.println();
 try{Thread.sleep(1000);}catch (Exception e){}
 }
 }
 catch (Exception e)
 {
 e.printStackTrace();
 }
 }
 }
 | 


       Example 6 - output
       
 | item [1]: value 1 | item [2]: value 2 | item [3]: value 3
 | item [1]: value 1 | item [2]: value 2 | item [3]: value 3
 | item [1]: value 1 | item [2]: value 2 | item [3]: value 3
 | item [1]: value 1 | item [2]: value 2 | item [3]: value 3
 | item [1]: value 1 | item [2]: value 2 | item [3]: value 3
...


        As soon as one of the properties values is changed, you will note 
		that the output will reflect it.


        TODO...
  
        Example 7 - Use of the annotation DJB_Exclude
        
        Example 8 - Alternative Injection method: DJBeansLoader.injectAllProperties